PROJECTS FOR THE PANDEMIC VIII: MAKING A HOME FOR YOUR SEAX
I purchased two seax blades—from Germany, one more of a scramseax, a contemporary term sometimes used for longer seaxes. Damascus steel and pretty darned pretty! I won’t go into hilting them, because I did not use a ferrule and just attached the blade to the hilt through a hole driven in the wood. Some note that this is done by heating the tang, but I have personally never been able to heat it enough. YMMV.

However, I would like to speak a little on the sheath for the smaller seax. In fact, the necessity for making new sheathes was one of the reasons I purchased the blades in the first place.
While many people might not believe it, we have plenty of artefactual evidence for how seaxes were carried in the day! I consulted a favorite book, Leather and Leatherworking in Anglo-Scandinavian and Medieval York by Quita Mould. Ian Carlisle and Esther Camerom, published by the Council for British Archaeology. It has a variety of shapes that have been found in Coppergate. I already an idea of what shape of sheath I wanted. I considered using a brass edge, as many sheathes of the period were so edged, though I consider that not only a trifle posh but a bit beyond my metal-working skills! I found a shape that I liked and used it, while changing the stitching a little so that I used a chain stitch on the outside, without any wood that the leather covered.
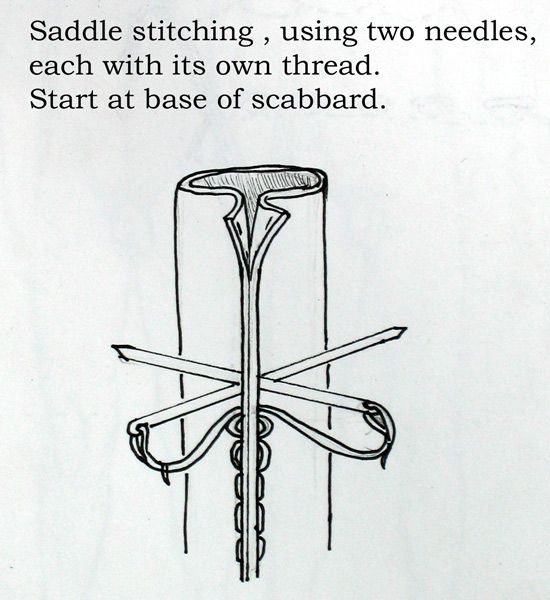
I chose veggie-tanned leather, about .24 inches (2.3 mm) thick. The size of the sheath itself is determined by the length and size. By trial and error—not much by this time—I determined how to cut the leather by laying the shape found in the book against it. I then bent it double and clamped the sides together, punching sewing holes with an awl, Using the two-needle method, I sewed the sheath in a lock/saddle stitch, sewing it with waxed 5 ply linen thread (sinew could be used as well, though you should stay away from cotton or polyester thread). I tied off the ends to make the stitching more secure.
I inserted the knife into the sheath and then dunked it in water so that the leather would shape and constrict. I did learn to be careful clamping, since there is a tendency for metal clips to discolor and streak the wet leather. Make certain there is enough room for the seax to enter and to leave the sheath easily. Oil, while making it easier for the leather to hold the shape, has a tendency to discolor the leather as well.
I finished it off by punching a hole into the sheath where it was indicated on the drawing. I used leather on the first and a hemp cord on the second, then attached it to my belt so that it hung usefully at my side. Wearing it tht way in a modern flding chair dangerously entanmgled it, so using a period stool or bech is more important than just being accurate!
Although YAT has found red-dyed leather sheathes and thinks additional colors were plausible, I did not dye the leather. The leather discolors naturally, assuming a pleasant patina, and I like the effect. Period sheaths were also often decorated with leather carving, using popular designs, so you can use knives or stamps on the finished sheath.


Leave a comment